Filming Windy Coastlines With Flip: A Practical Field Guide
Filming Windy Coastlines With Flip: A Practical Field Guide Built Around Better Mapping, Safer Flight, and Cleaner Shots
META: Learn how to use Flip for filming windy coastlines with smarter flight planning, obstacle avoidance, subject tracking, D-Log, Hyperlapse, and map-based decision making inspired by Esri drone workflows.
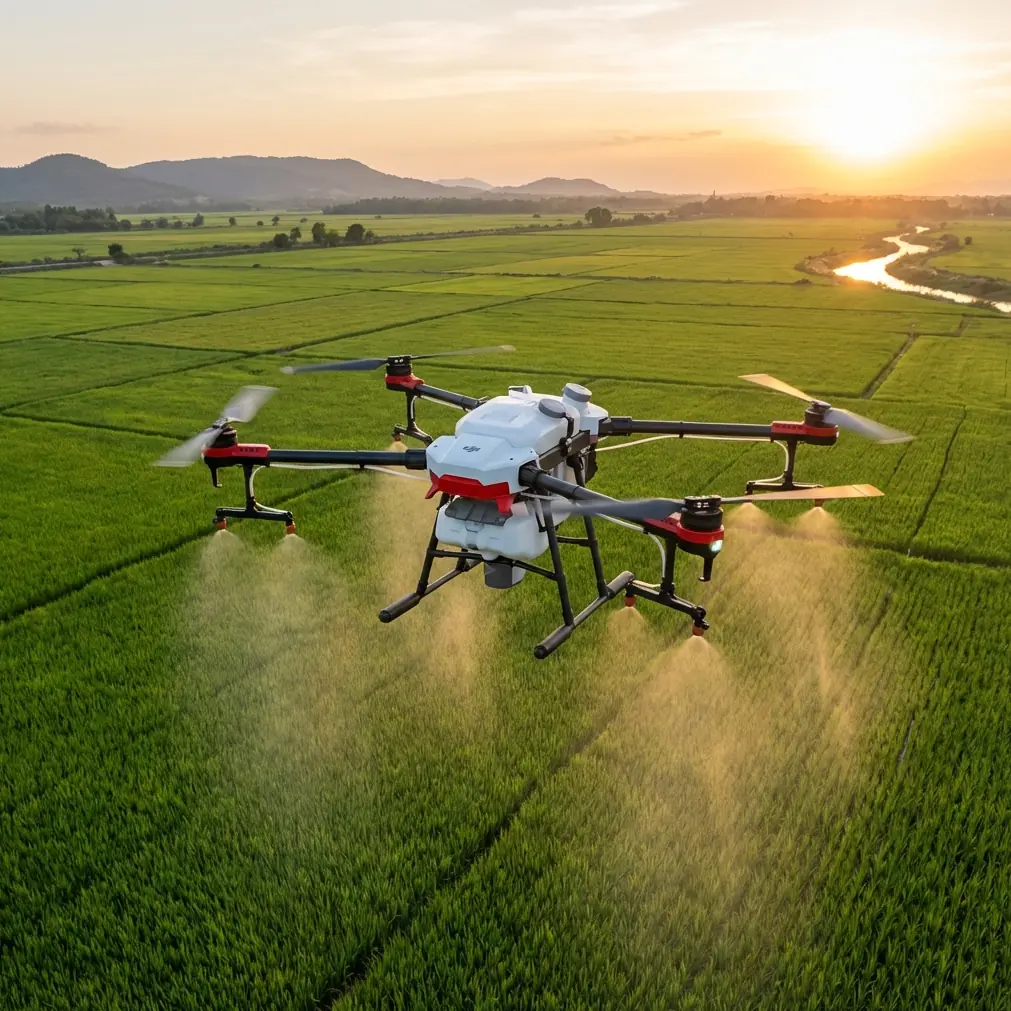
Wind at the coast has a way of exposing every weak habit a drone pilot has.
You think the shot is simple: a clean lateral pass along the waterline, maybe a reveal over rocks, then a tracking move as a subject walks the edge of the beach. Then the gusts shift. Sand lifts. The horizon gets messy. Your route stops making sense because what looked obvious from the ground turns chaotic once you’re in the air.
I’ve had days like that, especially filming shorelines where cliffs, jetties, tidal pools, and pedestrian traffic all pile into a narrow working corridor. The difference between bringing home usable footage and wasting batteries often comes down to one thing: whether you treat the flight as a visual mission or an information mission first.
That is where Flip becomes far more useful than a casual “camera drone” label suggests.
And interestingly, one of the clearest ways to think about using Flip in this environment comes from a very different reference point: an Esri drone solution slide showing a map-first workflow. Even through the rough extract, two details stand out clearly: the interface includes tools such as Basemap, Measure, Locate, Select By, and Infographics, and it references 4 Standalone Videos as hosted content. Those are not random UI labels. Operationally, they describe a mindset that matters for coastal filming: build geographic awareness before takeoff, and organize footage as discrete assets that can be reviewed and used with purpose.
So this guide is not just about flying Flip in wind. It is about using Flip like a creator who plans with spatial logic, captures with discipline, and edits with the final sequence already in mind.
The mistake most pilots make on a windy coastline
They chase scenes instead of building a flight structure.
At the coast, the environment changes faster than your assumptions. Wind direction shifts around rock walls. Sea spray affects visibility. Birds become a factor. Light can flatten water in minutes. If you simply launch and improvise, even a capable platform with obstacle avoidance and ActiveTrack can start feeling harder to control creatively.
What helped me was borrowing a map-centered workflow similar to the Esri reference. In that screenshot, the visible functions—Explore, Bookmarks, Basemap, Add, Select, Select By, Infographics, Measure, Locate—suggest a layered way of understanding terrain before collecting aerial data. For a creator using Flip, that translates into a practical pre-flight method:
- identify the coastline shape on a base map
- measure key distances for tracking runs
- locate safe launch and recovery points
- select alternate lines if wind blocks your primary route
- think of each video segment as a standalone deliverable, not just raw footage
That sounds simple. In the field, it changes everything.
Start with the coastline as a map problem, not a camera problem
Before I fly Flip at a windy shoreline, I break the location into zones.
A straight beach is one zone. A rock shelf is another. Any elevated bluff becomes a turbulence zone. Paths with hikers or cyclists become movement corridors. If there’s a harbor wall, staircase, or driftwood field, I mark those as visual anchors and potential risk points.
This is where the operational significance of the Esri-style Basemap and Measure tools becomes clear. Even if you’re not inside a GIS platform during every shoot, the habit matters. Measuring a planned pass tells you whether your battery budget supports two takes or only one. Estimating distance between launch point and subject route tells you whether ActiveTrack will stay reliable without pushing too far downwind.
For Flip, that means you can assign each battery a mission:
- Battery one: establishing shots and altitude checks
- Battery two: subject tracking along the safest corridor
- Battery three: stylized moves like Hyperlapse or orbit variations
That approach is far better than burning the first pack trying to “feel out” the location.
Why Flip works well when the coast turns unpredictable
The coastline punishes hesitation. Flip helps when you need speed and clarity in setup.
Its obstacle avoidance is especially relevant in coastal environments that are visually open but tactically cluttered. People assume beaches are simple because there are no buildings. But obstacles at the coast are often irregular and easy to misread: signposts, uneven stone outcrops, cliff edges, parked vehicles near access roads, low branches near dunes, and moving subjects entering frame unexpectedly.
Obstacle avoidance does not replace judgment, but it gives you margin. That margin matters more in crosswinds, because wind often pushes the aircraft off the perfect line right when you are concentrating on composition.
Subject tracking also becomes much more useful at the coast than many pilots realize. If your talent is walking a curving shoreline path, running a boardwalk, or moving across a headland trail, ActiveTrack can help preserve framing while you focus on altitude, direction of travel, and keeping the background clean. In gusty conditions, that reduction in manual workload is not a luxury. It’s a reliability advantage.
My preferred setup for windy shoreline shoots
I keep the camera plan conservative at first and creative later.
1. Use the first flight to read wind, not force hero shots
Your first flight should tell you three things:
- where the gusts are strongest
- which direction gives the smoothest ground track
- where the horizon looks best relative to swell and shoreline shape
I usually start with short linear passes parallel to the coast, then a brief climb to test stability at different heights. Wind can be harsher above cliff level than near the beach, or the opposite if terrain channels air low across the sand.
2. Shoot in D-Log when the light is unstable
Coastlines often produce difficult contrast: bright surf, dark rock, reflective wet sand, and fast-changing cloud cover. D-Log gives you more room to recover detail later, especially when the scene swings from sunlit water to shadowed terrain within the same move.
This is one of those choices that feels technical until you get back to the edit. Then it becomes obvious. If your subject’s path moves through variable light, D-Log can preserve the sequence in a way a baked-in look may not.
3. Reserve QuickShots for protected sections
QuickShots are useful, but I’m selective in wind. On open beaches, I prefer manual or semi-assisted moves first. Once I identify a more sheltered area—perhaps behind a ridge or near a cove with predictable airflow—that’s when QuickShots can deliver polished motion without fighting the environment.
4. Use Hyperlapse only after you’ve validated aircraft stability
A coastline Hyperlapse can look fantastic, especially with moving clouds and wave action. But it’s not the first thing I attempt. I wait until I know which segment of shoreline offers repeatable positioning and the least erratic gust behavior.
A better way to plan subject tracking on the coast
One of the most overlooked details in the Esri reference is Select By. In GIS, selection tools help isolate specific features or conditions. For creators, the concept is equally useful: isolate the exact stretch of coast that deserves tracking.
Don’t track a subject across the whole beach just because it is there. Select the segment with:
- consistent background texture
- low pedestrian interference
- manageable wind exposure
- enough lateral room for recovery
- a clear visual ending point
This selective approach improves ActiveTrack results because the subject route becomes more predictable. It also improves editing because each tracking segment has a clear visual purpose.
For example, instead of one long, messy follow shot, capture three separate passes:
- a low-angle side track near the waterline
- a rear follow as the subject approaches a headland
- a slightly elevated diagonal track for the reveal
Now your footage behaves like the 4 Standalone Videos mentioned in the Esri material. That detail matters. Hosted standalone clips are easier to review, compare, label, and reuse. On a real project, thinking in modular clips rather than one giant flight file reduces chaos in post-production.
The coastline challenge that changed my process
A few years back, I was filming on a rugged shoreline with a narrow path above the water. From the ground, it looked ideal: dramatic rock texture, clean leading lines, and enough open space to fly. Once airborne, the wind coming over the cliff face turned the route into a constant correction exercise. My framing suffered because I was reacting instead of executing.
The footage wasn’t unusable, but it had that telltale feel of a pilot fighting the location.
What I do now with Flip is much more deliberate. I scout the area as if I’m building a location layer set: launch points, no-go zones, foreground objects, people traffic, and route distances. I define which shots are establishing, which are tracking, and which are atmospheric inserts. That single shift—from “let’s see what looks good” to “let’s map the sequence”—has probably improved my hit rate more than any one camera setting.
If you want a quick way to compare route ideas or ask about a specific shoreline setup, this is a useful place to reach out: message a drone workflow specialist.
How to combine Flip’s features into a repeatable coastline workflow
Here’s the method I trust most.
Phase 1: Spatial read
Use a map or satellite view before arrival. Identify:
- shoreline bends
- obstacles near takeoff
- access paths
- elevation changes
- probable wind exposure zones
The Esri-style Locate function is conceptually important here. Knowing exactly where you’ll launch and where your subject will start removes wasted time on site.
Phase 2: Test flight
Launch Flip and do short controlled passes. Watch for:
- drift patterns
- horizon consistency
- gimbal response
- obstacle alerts near terrain edges
- signal behavior around cliffs or structures
Phase 3: Core captures
Prioritize reliable shots first:
- wide establishing passes
- slow reveals
- controlled side tracking
- short ActiveTrack sequences
If your goal is storytelling, these are the shots that carry the edit. Fancy moves are secondary.
Phase 4: Style layer
Once the essentials are secure, add:
- QuickShots in calmer micro-locations
- Hyperlapse over stable sections
- higher-altitude geometry shots
- low dramatic passes where safe and legally appropriate
Phase 5: Organize immediately
Think back to the reference mentioning hosted content and 4 Standalone Videos. Don’t dump everything into one unlabeled pile. Tag clips by route, subject, wind condition, and intended use. Future you will be grateful.
What obstacle avoidance really means in this setting
On paper, obstacle avoidance sounds like a general safety feature. On a windy coast, it becomes a shot-saving feature.
Why? Because gusts rarely push the aircraft in a cinematic direction. They push it toward the thing you weren’t prioritizing in your mental picture. A signpost at beach access. A scrub branch on the dune edge. A jagged rock projection you cleared a second ago but now need to clear again during a correction.
The value is not merely avoiding impact. The value is preserving confidence. When you trust the aircraft to help manage spatial risk, you can spend more attention on timing, subject placement, and how the shoreline layers in frame.
That is the real operational advantage.
Editing starts in the air
Coastal footage becomes stronger when each flight segment has a job.
This is another reason the “standalone videos” idea from the source matters. When you separate your clips by purpose, your final film gains rhythm:
- opener: broad coast geography
- mid-sequence: human movement within landscape
- detail layer: water texture, rock contours, foam lines
- closer: retreating reveal or elevated pull-away
Flip supports that style of capture well because its assisted features can reduce the workload on repeatable shots. You are not just collecting spectacle. You are collecting pieces that cut together cleanly.
Best practices that actually hold up in wind
A few final habits matter more than any feature checklist.
Keep your moves shorter than you think. Wind magnifies fatigue and small errors over distance.
Fly the same route twice if the first take is close but not clean. Wind often gives you one bad pass and one excellent pass over the same line.
Use ActiveTrack for structure, not for blind trust. Watch the full environment, especially at transitions where the subject moves near shadows, rocks, or other people.
If the coast is visually busy, simplify. A single strong lateral move beats a complicated route with three weak moments.
And when conditions are rough, let the landscape do the work. You don’t need aggressive motion when waves, cloud movement, and cliff geometry are already giving the frame energy.
That’s the core lesson I’ve learned from filming coastlines with Flip: the best results come when you blend creator instincts with the discipline of a mapping workflow. The Esri reference, sparse as it is, points in the right direction. Tools like Basemap, Measure, and Locate remind us that aerial work improves when geography leads the plan. The mention of 4 Standalone Videos is a quiet reminder to capture intentionally, not endlessly.
For windy coastline work, that mindset is often the difference between bringing home random clips and building a sequence that feels precise, calm, and expensive.
Ready for your own Flip? Contact our team for expert consultation.