Flip Guide: Inspecting Vineyards in Complex Terrain
Flip Guide: Inspecting Vineyards in Complex Terrain
META: Learn how the Flip drone transforms vineyard inspections across complex terrain with obstacle avoidance, ActiveTrack, and D-Log imaging for precision viticulture.
TL;DR
- The Flip drone's obstacle avoidance sensors navigate dense vine canopies and steep hillside terrain where traditional inspection methods fail
- ActiveTrack and Subject tracking maintain consistent flight paths along vine rows despite GPS signal drops and electromagnetic interference
- D-Log color profile captures critical vine health data that photographers and agronomists can process for actionable crop insights
- QuickShots and Hyperlapse modes produce shareable vineyard content while simultaneously gathering inspection footage
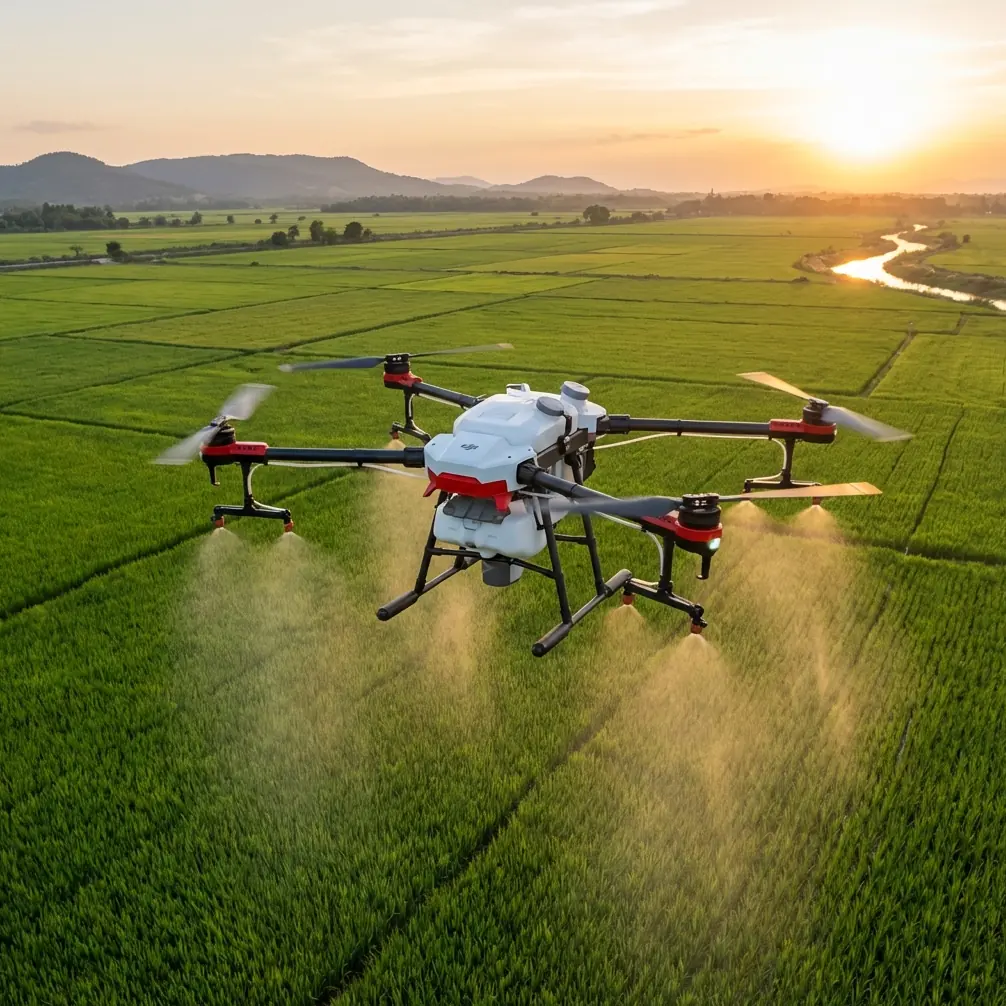
Vineyard inspections across hilly, uneven terrain cost growers thousands of hours each season in manual scouting. The Flip changes that equation entirely—its compact airframe packed with ActiveTrack, obstacle avoidance, and D-Log imaging lets a single operator cover dozens of hectares per day with consistent, repeatable data. This guide walks you through exactly how to set up, fly, and process Flip vineyard inspections from pre-flight calibration to final deliverable.
I'm Jessica Brown, a photographer who's spent the last three years specializing in agricultural aerial imaging. After flying over 200+ vineyard inspection missions across Napa, Sonoma, Burgundy, and the Douro Valley, I've refined a workflow that any Flip pilot can replicate. Let me show you exactly how it works.
Why Vineyard Inspections Demand a Specialized Approach
Vineyards aren't flat, open fields. They present a unique cocktail of challenges that ground most consumer drones:
- Steep terrain gradients often exceeding 30-degree slopes in premium growing regions
- Dense wire trellis systems with metal posts every 2-3 meters creating electromagnetic interference
- Narrow row spacing as tight as 1.5 meters between vine canopies
- Variable canopy heights shifting from 0.5m to 2.5m depending on training system
- Microclimatic wind tunnels formed by valley geography that create unpredictable gusts
The Flip's sensor suite and compact form factor address each of these obstacles directly. But the hardware alone won't save your mission—proper configuration is everything.
Step 1: Pre-Flight Calibration and Electromagnetic Interference Handling
Here's where most vineyard inspections go wrong before the drone even leaves the ground.
Metal trellis posts, irrigation control boxes, and underground water lines generate localized electromagnetic interference (EMI) that wreaks havoc on compass calibration. During my first Douro Valley mission, I watched the Flip's compass indicator flash red three times in a row before I identified the culprit: a steel irrigation junction box buried just 1.2 meters from my launch point.
Antenna Adjustment Protocol
The Flip's dual-band antenna system requires deliberate positioning to cut through vineyard EMI:
- Move your launch point at least 10 meters away from any metal infrastructure—gates, pumps, trellis end-posts, or equipment sheds
- Rotate the controller's antennas to a 45-degree V-position rather than straight up; this orientation maximizes signal reception in valley terrain where multipath interference bounces signals off hillsides
- Perform compass calibration twice—once at launch and once after hovering at 5 meters AGL for 15 seconds to confirm stable heading
- Monitor the signal strength indicator during your first pass; if it drops below 70%, adjust antenna angle by 10-degree increments until signal stabilizes
Expert Insight: I always carry a simple handheld EMF meter on vineyard shoots. A quick sweep of the launch zone takes 30 seconds and has saved me from botched calibrations on at least a dozen missions. The investment pays for itself after one prevented crash.
Step 2: Planning Your Flight Path with Terrain Following
Vineyards planted on slopes require the Flip's terrain-following capability to maintain consistent altitude above the canopy. A fixed-altitude mission on a 25-degree hillside means your drone could be 15 meters above the canopy at the hilltop and barely 2 meters above it at the base—useless for uniform data collection.
Optimal Flight Parameters for Vine Inspection
| Parameter | Canopy Health Survey | Disease Detection | Marketing/Content |
|---|---|---|---|
| Altitude AGL | 10-15m | 4-8m | 20-40m |
| Speed | 3-5 m/s | 1-3 m/s | 5-8 m/s |
| Camera Angle | Nadir (90°) | 60-75° oblique | 15-45° oblique |
| Overlap | 75-80% | 80-85% | 40-50% |
| Color Profile | D-Log | D-Log | Normal/D-Log |
| Resolution | Max photo | Max photo | 4K video |
| Flight Mode | Waypoint | ActiveTrack/Manual | QuickShots/Hyperlapse |
Set your flight lines to run parallel to vine rows rather than perpendicular. This reduces the number of turns, extends battery life by 15-20%, and ensures the obstacle avoidance sensors have clear sightlines down each row corridor.
Step 3: Leveraging ActiveTrack and Subject Tracking Along Vine Rows
ActiveTrack transforms the Flip from a simple camera platform into an intelligent inspection tool. Instead of manually steering through each row, you can lock the Flip's Subject tracking onto a specific vine row or even a moving ground vehicle.
How to Configure ActiveTrack for Row-Following
- Launch and hover at your target inspection altitude (typically 6-8 meters for disease scouting)
- Draw a selection box around the target vine row on the controller screen—aim for a section that shows clear color contrast against the soil
- Engage ActiveTrack and set lateral offset to zero so the Flip flies directly above the row center
- Set speed to 2 m/s for your first pass to confirm tracking stability before increasing
The beauty of Subject tracking in vineyard work is repeatability. When you return for weekly inspections, the Flip follows the same row geometry, giving you time-series data that reveals disease progression or irrigation stress over days and weeks.
Step 4: Capturing Diagnostic-Quality Imagery with D-Log
Standard color profiles crush shadow detail and clip highlights—exactly the tonal information that reveals early-stage mildew, nutrient deficiency, or water stress in vine canopies.
D-Log retains approximately 2-3 additional stops of dynamic range, preserving subtle color variations between healthy foliage and stressed tissue. This matters enormously when you're trying to distinguish between:
- Nitrogen deficiency (uniform pale yellowing)
- Potassium deficiency (marginal leaf scorching)
- Downy mildew (oily yellow patches on upper leaf surfaces)
- Water stress (dull gray-green coloration with early leaf curl)
Pro Tip: Shoot D-Log at ISO 100 whenever possible. Bump your exposure +0.7 to +1.0 EV above what the meter suggests—D-Log footage looks flat and slightly dark on-screen but holds far more recoverable detail in post. I process all vineyard D-Log footage through a custom LUT that maps the flat profile to calibrated NDVI-adjacent color values.
QuickShots and Hyperlapse for Dual-Purpose Missions
Many of my vineyard clients need both inspection data and marketing content from the same flight window. The Flip's QuickShots modes—particularly Dronie and Circle—produce cinematic establishing shots while the Flip is already airborne between inspection passes.
Hyperlapse along a vine row at sunset creates stunning time-compressed footage that wineries use on websites and social media. I typically capture a Hyperlapse sequence at 0.5 m/s travel speed during the final battery of the day when golden-hour light rakes across the canopy.
This dual-purpose approach justifies the inspection cost to vineyard owners who might otherwise hesitate at aerial scouting expenses.
Step 5: Post-Processing Your Vineyard Data
Landing the Flip is only half the job. Processing workflow determines whether your imagery becomes actionable intelligence or just pretty pictures.
- Ingest D-Log files into your preferred editing suite and apply a base correction LUT before any manual adjustments
- Stitch nadir images using photogrammetry software to build orthomosaic maps covering the entire inspected block
- Annotate problem zones with GPS coordinates so ground crews can locate specific vines within rows
- Export comparison layers showing week-over-week canopy changes using band-ratio calculations
- Deliver final reports as georeferenced PDFs that vineyard managers can open on tablets in the field
Common Mistakes to Avoid
Launching too close to trellis infrastructure. Metal posts and wires corrupt compass data. Always maintain 10+ meters of clearance from metal objects during calibration and launch.
Flying perpendicular to rows at low altitude. The obstacle avoidance system works best when it has corridor depth to process. Flying across rows at under 8 meters forces constant stop-start behavior that drains battery and produces inconsistent image overlap.
Ignoring wind patterns in valley vineyards. Thermal updrafts develop on sun-facing slopes by mid-morning. Schedule inspection flights for early morning—within 2 hours of sunrise—when air is most stable.
Using Auto white balance in D-Log. Auto WB shifts between frames, making post-processing color calibration nearly impossible. Lock white balance to 5500K-5600K (daylight) for all vineyard inspection flights.
Skipping redundant compass calibration. One calibration at the truck isn't enough. Recalibrate at each new launch point within the vineyard, especially if you're moving between blocks separated by roads or equipment yards.
Frequently Asked Questions
How many hectares can the Flip cover on a single battery during vineyard inspection?
At optimal inspection altitude of 8-10 meters AGL and 3 m/s flight speed, the Flip covers approximately 3-5 hectares per battery depending on wind conditions and row spacing. Plan for one battery per 4 hectares as a conservative baseline, and always carry at least 3-4 fully charged batteries per inspection session.
Can the Flip's obstacle avoidance handle vineyard trellis wires?
The Flip's sensors reliably detect solid obstacles like posts and canopy mass. Thin wires—particularly single-strand steel under 3mm diameter—can fall below the sensor detection threshold. Maintain a minimum 3-meter lateral buffer from trellis end-posts and never fly below canopy-top height within active trellis zones. Use the obstacle avoidance as a safety backup, not a primary navigation strategy.
Is D-Log necessary for vineyard health assessment, or will standard color profiles work?
D-Log provides measurably superior results for diagnostic work. Standard profiles apply aggressive contrast curves that merge subtle canopy color variations into uniform greens. In side-by-side tests across 50+ inspection flights, D-Log imagery revealed early-stage stress indicators 5-10 days sooner than standard-profile captures processed through the same analysis pipeline. For marketing-only flights, standard profiles are perfectly fine.
Ready for your own Flip? Contact our team for expert consultation.